To read all posts on my Everest Base Camp trek, click here for the complete series.
A lot of people have been asking me how I prepared for Everest Base Camp, what stuff did I bring, what life was like on the trail, etc. Someone even asked me if I had to ration my food for 12 days and cook my meals over a campfire every night. Lol.
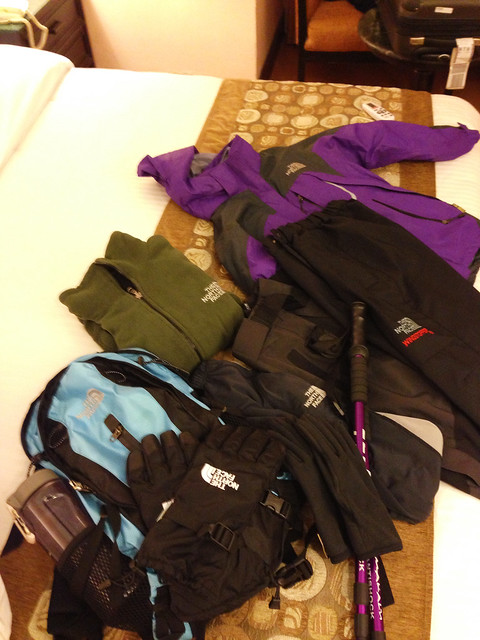
This blog post is written for those who are doing this trek for the very first time and wish to know what to expect. I've also made a previous post on a breakdown of all expenses during an Everest Base Camp trek as well as another blog entry on a complete packing list for trekkers to EBC.
I wrote all these because I wanted to share my experiences, and hopefully help somebody in preparing for this once-in-a-lifetime trek. And if this blog post does convince someone to go and do it, that would make me very happy!
1. Go solo or go with a group or buddy? Trek costs can be shared between friends and/or couples, especially when it comes to food, lodgings or a nice pot of piping hot chocolate. Plus, you're bound to take each other's photos the whole way going up, so there won't be any shortage of captured memories. Just be sure your trekking buddy is someone you really get along with--because you'll be stuck with one another 24/7. Joining a group can also be arranged prior to the trek. If you are hiring a local trekking agency, they normally group you with others who are scheduled to trek on the same day as you are. You can also arrange with the agency for you and your buddy to trek as a private group. Or, you can always go on those Lonely Planet and Trip Advisor forums where people are looking for fellow trekkers to trek with them on specific two- or three-week periods.
I traveled solo, and I loved every minute of it. There is absolutely no reason for anyone--especially for solo female travelers out there--to be concerned about doing Everest Base Camp alone. First of all, you aren't really alone. There's a guide and porter with you, and at the end of each day, you get to meet fellow trekkers in the teahouse you're staying in for the night. The trail is full of people, especially during peak season. However, independent trekkers are normally discouraged to travel completely alone; in the event that one needs medical assistance, someone may not be readily on hand to answer the call for help.
The advantage of traveling solo is that I got to do everything at my own pace. I didn't have to deal with the pressure of keeping pace with total strangers, who may be impatient and way faster than me, or may be super slow. Or they may be the type to complain a lot, talk too much, exhibit annoying characteristics, etc. If I had happened to get stuck with people I didn't really like, then I would have had no choice but to spend 12 full days in their company.
When I craved solitude, I got to have my 'alone' time. When I felt like chatting with people, I'd talk to other trekkers in the teahouse or I'd strike up a conversation with a stranger on the trail. Most of the time, I talked and played cards with my guide and porter, and those were great bonding times. But whenever I felt the need to be alone, I had enough space and time to enjoy my solitude. Solo traveling is pretty fun as it puts you in control of all your travel arrangements.
2. Getting a local trekking agency vs. Do-It-Yourself. I didn't even include foreign trekking agencies (located outside Nepal) as an option. They are just too expensive. I mean, sorry, but what's the point of going through them? You can arrange the trek logistics yourself or search the Internet for credible trekking agencies in Nepal. There are plenty of them, and the Nepalis are honest people to deal with.
That said, once you decide to go DIY or through a local agency, this will pretty much spell out how your trip will look like. Decide between these 2 options, and everything else will follow. It all depends on your comfort level, budget, and how you want to control things. For more information on what to budget for, visit my blog post on costs to expect during an Everest Base Camp trek.
Going DIY means hiring your own guide and/or porter and making your room and food arrangements as you go. Guides and/or porters can be hired the moment you land in Lukla. You will of course need to talk to them (and rely on your wits and gut instinct to see if you're comfortable enough to be with them for 12 days) prior to striking a deal. Most, if not all, of the Nepalis I've met along the trail are polite and friendly. Tourism is what drives the economy of the Khumbu region where Everest is, and trekkers are treated with great hospitality.
I opted to get a local trekking agency, Himalayan Planet Adventures (HPA), and I chose their 16-day Everest Base Camp trek package. While getting an agency may be rather pricier than trekking independently, I felt it suited my budget and my idea of how I wanted my trip to be. I didn't want to deal with the hassle of looking for a guide and porter, securing my own domestic flights, choosing a teahouse at the end of each day, and reaching for my wallet after every meal I ate.
When I arrived in Kathmandu, everything was conveniently arranged for me; I just paid for the full package cost--which included my hotel in Kathmandu, teahouse lodgings, food, guide and porter fees, permits, domestic flights, and airport transfers. With this package, I could pick any food item on the menu in any teahouse I was in, and I could also have my choice of hot drink with each meal plus a bowl of soup a day. I didn't have to worry about carrying loads of cash (or losing all that cash!), because my guide Madan took care of the lodging and food arrangements in my behalf. All I had to shell out personally as miscellaneous expenses were mineral water, hot showers, treats (like chocolate), battery charging and Wi-Fi.
When I was stuck in Lukla for a day before heading out to Kathmandu, the HPA team was the one arranging for my revised domestic flight bookings and a possible chopper ride. For me, it was all about leaving the nitty-gritty logistics to the agency so that I could fully focus on the physical demands of the trek.
Again, it all depends on your budget and the level of comfort and control you're expecting on the trail. It's your Everest Base Camp trek, so feel free to choose whichever option makes you happy.
3. Physical Conditioning. Obviously, you have to be decently fit for this trek. You don't need to be ultra athletic (I'm most definitely not!); just make sure you have had some form of physical preparation a few months before EBC. Some trekkers do conditioning for an entire year prior to the trek. If you do regular exercise, you'll be fine. I do running, boxing and bikram yoga (hot yoga) during my spare time. When I was preparing 3 months before Base Camp, I just merely had to increase the rounds I'd do for boxing, or run a few more extra kilometers as endurance training. I've been doing bikram yoga for two years now, and I've realized that all those breathing exercises at the start of each bikram session really helped me during the hardest days of the trek.
4. Going Vegetarian for 12 Days. It's not like you have much of a choice, actually. Be gastronomically prepared to go vegetarian all throughout the trek. There is no frozen storage system in the Khumbu region, and all uncooked meat are carried up and down by Sherpas. The freshness of the meat can't be guaranteed. So if you have a sensitive stomach or if you don't want to risk acquiring some gastrointestinal illness, avoid meat altogether while you're on the trek. My guide Madan said I could have meat at Namche Bazaar or at lower elevations, so if you are really craving a burger or meat pizza, you can have those at lower altitude levels.
I played it safe and avoided meat completely. I thought I would be weak for the whole 12 days but I felt surprisingly healthy and strong. The Sherpas at the teahouses can really cook up a storm, and they serve really delicious veggie dishes like garlic cheese pasta and vegetable rice. And then there is the ubiquitous staple meal of the Nepalis which they can eat day in, day out and never get tired of--dal bhat. It is a dish that is composed of rice (bhat) and cooked lentil soup (dal) that is most often supplemented by vegetables, potato curry, pickled chili, and sometimes with roti or papadum.
I would sometimes find myself looking forward to a steaming hot plate of dal bhat at the end of a cold, wet day of trekking. The best part is, the Nepalis always serve you more than one round of dal bhat if you're in the mood for seconds or thirds.
5. Bring cash. I kind of learned this the hard way. Before the trek, I made sure to withdraw enough money from an ATM in Thamel, Kathmandu, because I read somewhere that there would not be any ATMs to be found up on the trail (for very obvious reasons). No credit card machines either past Namche, of course. So make sure you have Nepalese Rupees with you before you fly to Lukla. This is so important. When I got back from the trek, I was kind of running low on cash and I wanted to withdraw money, especially when I was stuck for an extra day in Lukla. No ATM machines there, but you could ask your guide to bring you to a few banks in Lukla that can swipe your credit card for you, and then they will provide you with the cash equivalent. Thankfully, I didn't have to do that, as I was able to fly to Kathmandu the next day.
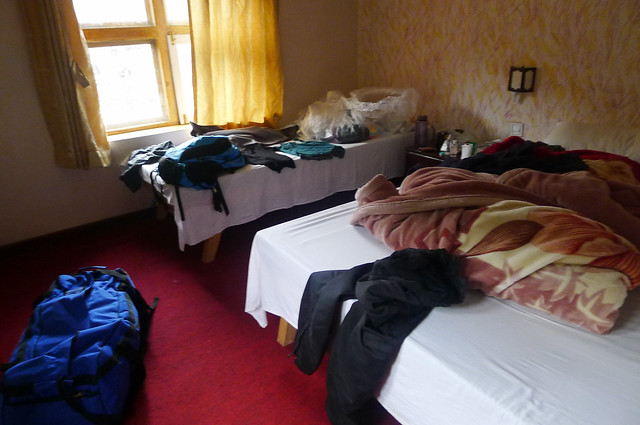
6. Expect basic accommodations. This is a trek to Everest Base Camp, after all, so best to lower your expectations. Frankly speaking, roughing it during the trek is really part of the charm, and I was glad to go through such an experience. Teahouses (which are like small, more basic-looking Swiss chalets) along the trail normally offer rooms that contain two single beds each, common toilets (some have common shower facilities), a big common dining area where everyone gathers--and zero central heating system. Well, there's the stove in the middle of the dining hall that's basically the warmest place in the entire teahouse--but it's only lit for a few hours every evening.
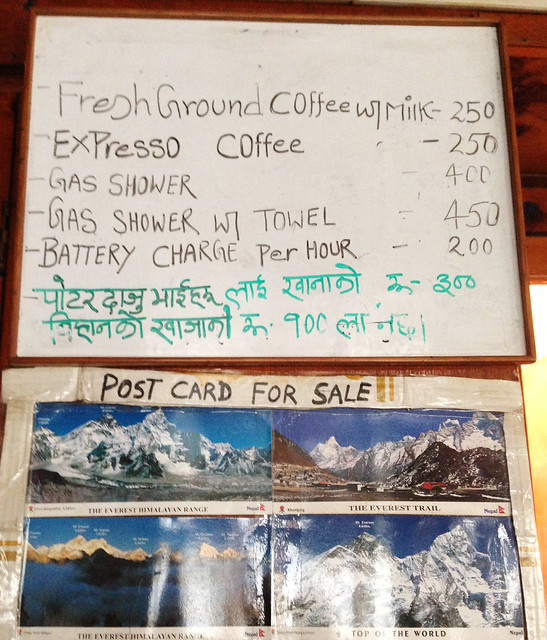
Toilets are usually the squat kind, but many teahouses have at least one Western toilet. As for showers, you can encounter either a 'bucket shower' or a 'gas shower' in some teahouses. Read about my bucket shower experience if you're the type who needs to have at least one or two showers during the entire trek.
Rooms get smaller the higher you go up, but are decent enough, if you're not the fussy type. All rooms have pillows and blankets, and you could always request for extra, when it's low season. Come peak season, you will need to depend on your sleeping bag and just one blanket to keep you warm--as teahouses can really fill up fast with trekkers. Trekkers who aren't able to get a room end up sleeping in the dining hall.
Most teahouses at higher elevations are powered by solar electricity; there are times when you are unable to charge your phone or camera at all because there is no electricity. So when you are in a teahouse that does have electricity, do grab the opportunity to charge your gadgets. You wouldn't want to run out of batt when you get to Base Camp.
7. Give way to Sherpas and yaks. Try and compete for space on the narrow trail path with a yak--and chances are, you'll be injured by its sharp horns, or worse, you may get nudged off the cliff. When a train of yaks is arriving, you need to stop trekking, step aside, and practically press yourself against the mountain wall to avoid being a yak victim.
As for Sherpas, you can't help but respect them and give them the right of way-especially when they're carrying thick stacks of plywood on their backs or heavy drums filled with goods. The people of the Khumbu region are impressively strong, but they're human, too. When you encounter them on the trail carrying heavy loads, give them a break by not blocking their path. The reason you have a roof over your head and a decent bed to sleep in on the remote trails of the Himalayas is because Sherpas carried all those construction materials on their backs up to the top.
Mild AMS is normal and is experienced by many. But severe AMS is debilitating, and any person with moderate to severe AMS should already be given the medical attention needed. Under such cases, the trekker experiencing bad altitude sickness is already made to descend as rapidly as possible before it becomes fatal.
Mild symptoms include headache, fatigue, breathlessness, and loss of appetite--all of which I experienced at some stages and which were addressed immediately. You know you already have severe AMS if you're experiencing severe headache, disorientation, vomiting, breathlessness (even at a standstill) or if you're exhibiting irrational behavior. If these symptoms are happening at the same time or one after the other, you need to descend immediately or have your guide arrange for a helicopter evacuation, weather permitting.
Here's how to avoid severe altitude sickness:
a. Proper Acclimatization - I talked about acclimatization in this post, as explained to me by Naba and Madan of Himalayan Planet Adventures. The general rule is to 'climb high, sleep low.' And for about every 1,000 meters of ascent, you will be asked to stay an extra day at that current level in order for your body to adjust and acclimatize. Your guide should be able to advise you on this. And please do not trek completely alone. Who's going to guide you down the path when you have a massive headache, and you're retching and feeling dizzy and disoriented? When I was experiencing minor AMS on the way to Pangboche on Day 4, Madan and Dhan Kumar were there to help me and monitor my condition.
b. Drink 3-4 liters of liquids a day - Because of the demands of the trek, you will easily consume at least 2-3 liters of water a day. Never allow yourself to be dehydrated, as this helps contribute to AMS. Liquids such as hot chocolate and garlic soup also helped me a lot; garlic soup is a natural preventive method against AMS and is pretty delicious. Coffee and too much tea are actually not recommended during the trek, as these cause heart palpitations. As much as I am fond of coffee, I had to stop around Day 3.
c. Take Diamox - Diamox (generic name: Acetazolamide) is the medicine one takes to counter the effects of altitude sickness. On the Internet, there are differing opinions as to when to take it--whether to start taking it 24 hours before the trek or to take it when you start feeling symptoms, or to simply avoid it at all. My advice: consult a doctor prior to the trek. Diamox can affect people in different ways. In my case, I only took Diamox when I started contracting minor altitude sickness, which was in Day 4 of the trek. My daily dosage was 250mg--split into two, so I could take 125mg in the morning and 125mg in the evening. You can buy Acetazolamide in Kathmandu or in your own country. In the Philippines, it is known as Cetamid. Some typical side effects of Diamox include frequent peeing and a tingling sensation on your toes and fingertips.
d. Pace yourself - I honestly don't get why some trekkers feel pressured into going up to Everest Base Camp as fast as they can. This isn't a race. Nobody back home would really care about your pace per day or if you outpaced your trekmates; they just want you safe and alive. I hear and read sad stories about how there are ultra-fit, super competitive people who trekked to EBC only to descend because their bodies couldn't handle it, that they didn't acclimatize properly, that they overexerted themselves, etc. In some cases, trekking with a group even presents dangers, as people have different stride lengths, endurance levels, and pacing--and all this makes some feel 'pressured' into keeping up with the overall pace of the group.
e. Avoid alcoholic beverages and cigarettes during the trek - You do not want a hangover to enhance your experience of altitude sickness. You really do not. And breathing the thin air through the nose or mouth is already a hard task; you won't be able to smoke properly anyway. Reserve the liquor and tobacco for your last day, when you're back in Lukla.
Sorry for the long post, but that's pretty much it! All the important stuff to know before heading off for the Everest Base Camp trek. This is my last post on Everest Base Camp (whew!) and I hope you found something useful or at least mildly entertaining in all the 10 or so posts I've written. The grandeur of the Himalayas has inspired me so much that I'm actually planning my next trekking trip to Nepal. I won't say yet where in Nepal exactly I'm going but I hope to update you on that one of these days. :)
 |
| Seeing this map makes me realize how far I've trekked--from Lukla all the way to Everest Base Camp. Oh my God. Image Credit: Himalayan Planet Adventures P. Ltd. |
A lot of people have been asking me how I prepared for Everest Base Camp, what stuff did I bring, what life was like on the trail, etc. Someone even asked me if I had to ration my food for 12 days and cook my meals over a campfire every night. Lol.
This blog post is written for those who are doing this trek for the very first time and wish to know what to expect. I've also made a previous post on a breakdown of all expenses during an Everest Base Camp trek as well as another blog entry on a complete packing list for trekkers to EBC.
I wrote all these because I wanted to share my experiences, and hopefully help somebody in preparing for this once-in-a-lifetime trek. And if this blog post does convince someone to go and do it, that would make me very happy!
1. Go solo or go with a group or buddy? Trek costs can be shared between friends and/or couples, especially when it comes to food, lodgings or a nice pot of piping hot chocolate. Plus, you're bound to take each other's photos the whole way going up, so there won't be any shortage of captured memories. Just be sure your trekking buddy is someone you really get along with--because you'll be stuck with one another 24/7. Joining a group can also be arranged prior to the trek. If you are hiring a local trekking agency, they normally group you with others who are scheduled to trek on the same day as you are. You can also arrange with the agency for you and your buddy to trek as a private group. Or, you can always go on those Lonely Planet and Trip Advisor forums where people are looking for fellow trekkers to trek with them on specific two- or three-week periods.
I traveled solo, and I loved every minute of it. There is absolutely no reason for anyone--especially for solo female travelers out there--to be concerned about doing Everest Base Camp alone. First of all, you aren't really alone. There's a guide and porter with you, and at the end of each day, you get to meet fellow trekkers in the teahouse you're staying in for the night. The trail is full of people, especially during peak season. However, independent trekkers are normally discouraged to travel completely alone; in the event that one needs medical assistance, someone may not be readily on hand to answer the call for help.
The advantage of traveling solo is that I got to do everything at my own pace. I didn't have to deal with the pressure of keeping pace with total strangers, who may be impatient and way faster than me, or may be super slow. Or they may be the type to complain a lot, talk too much, exhibit annoying characteristics, etc. If I had happened to get stuck with people I didn't really like, then I would have had no choice but to spend 12 full days in their company.
When I craved solitude, I got to have my 'alone' time. When I felt like chatting with people, I'd talk to other trekkers in the teahouse or I'd strike up a conversation with a stranger on the trail. Most of the time, I talked and played cards with my guide and porter, and those were great bonding times. But whenever I felt the need to be alone, I had enough space and time to enjoy my solitude. Solo traveling is pretty fun as it puts you in control of all your travel arrangements.
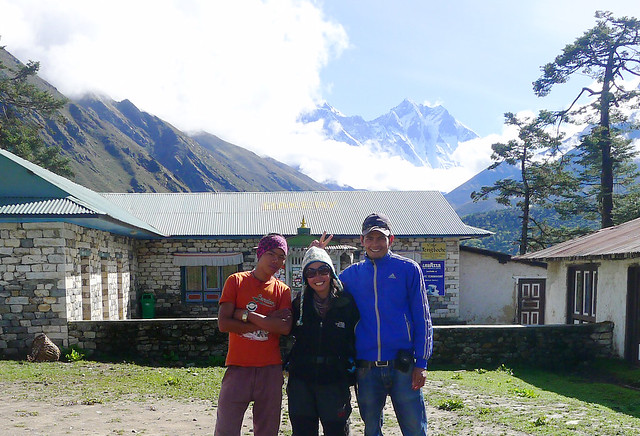 |
| I traveled solo--and my best friends on the trek were Dhan Kumar (left) and Madan (right), my porter and guide, respectively. This is my favorite picture of us in Tengboche. Everest is right behind us three. |
2. Getting a local trekking agency vs. Do-It-Yourself. I didn't even include foreign trekking agencies (located outside Nepal) as an option. They are just too expensive. I mean, sorry, but what's the point of going through them? You can arrange the trek logistics yourself or search the Internet for credible trekking agencies in Nepal. There are plenty of them, and the Nepalis are honest people to deal with.
That said, once you decide to go DIY or through a local agency, this will pretty much spell out how your trip will look like. Decide between these 2 options, and everything else will follow. It all depends on your comfort level, budget, and how you want to control things. For more information on what to budget for, visit my blog post on costs to expect during an Everest Base Camp trek.
Going DIY means hiring your own guide and/or porter and making your room and food arrangements as you go. Guides and/or porters can be hired the moment you land in Lukla. You will of course need to talk to them (and rely on your wits and gut instinct to see if you're comfortable enough to be with them for 12 days) prior to striking a deal. Most, if not all, of the Nepalis I've met along the trail are polite and friendly. Tourism is what drives the economy of the Khumbu region where Everest is, and trekkers are treated with great hospitality.
I opted to get a local trekking agency, Himalayan Planet Adventures (HPA), and I chose their 16-day Everest Base Camp trek package. While getting an agency may be rather pricier than trekking independently, I felt it suited my budget and my idea of how I wanted my trip to be. I didn't want to deal with the hassle of looking for a guide and porter, securing my own domestic flights, choosing a teahouse at the end of each day, and reaching for my wallet after every meal I ate.
When I arrived in Kathmandu, everything was conveniently arranged for me; I just paid for the full package cost--which included my hotel in Kathmandu, teahouse lodgings, food, guide and porter fees, permits, domestic flights, and airport transfers. With this package, I could pick any food item on the menu in any teahouse I was in, and I could also have my choice of hot drink with each meal plus a bowl of soup a day. I didn't have to worry about carrying loads of cash (or losing all that cash!), because my guide Madan took care of the lodging and food arrangements in my behalf. All I had to shell out personally as miscellaneous expenses were mineral water, hot showers, treats (like chocolate), battery charging and Wi-Fi.
When I was stuck in Lukla for a day before heading out to Kathmandu, the HPA team was the one arranging for my revised domestic flight bookings and a possible chopper ride. For me, it was all about leaving the nitty-gritty logistics to the agency so that I could fully focus on the physical demands of the trek.
Again, it all depends on your budget and the level of comfort and control you're expecting on the trail. It's your Everest Base Camp trek, so feel free to choose whichever option makes you happy.
3. Physical Conditioning. Obviously, you have to be decently fit for this trek. You don't need to be ultra athletic (I'm most definitely not!); just make sure you have had some form of physical preparation a few months before EBC. Some trekkers do conditioning for an entire year prior to the trek. If you do regular exercise, you'll be fine. I do running, boxing and bikram yoga (hot yoga) during my spare time. When I was preparing 3 months before Base Camp, I just merely had to increase the rounds I'd do for boxing, or run a few more extra kilometers as endurance training. I've been doing bikram yoga for two years now, and I've realized that all those breathing exercises at the start of each bikram session really helped me during the hardest days of the trek.
 |
| I'm not the best in taking food photos, but this tomato garlic pasta with yak cheese tastes so good! Fresh or dried chili is always available if you like your food spicy like I do. |
I played it safe and avoided meat completely. I thought I would be weak for the whole 12 days but I felt surprisingly healthy and strong. The Sherpas at the teahouses can really cook up a storm, and they serve really delicious veggie dishes like garlic cheese pasta and vegetable rice. And then there is the ubiquitous staple meal of the Nepalis which they can eat day in, day out and never get tired of--dal bhat. It is a dish that is composed of rice (bhat) and cooked lentil soup (dal) that is most often supplemented by vegetables, potato curry, pickled chili, and sometimes with roti or papadum.
I would sometimes find myself looking forward to a steaming hot plate of dal bhat at the end of a cold, wet day of trekking. The best part is, the Nepalis always serve you more than one round of dal bhat if you're in the mood for seconds or thirds.
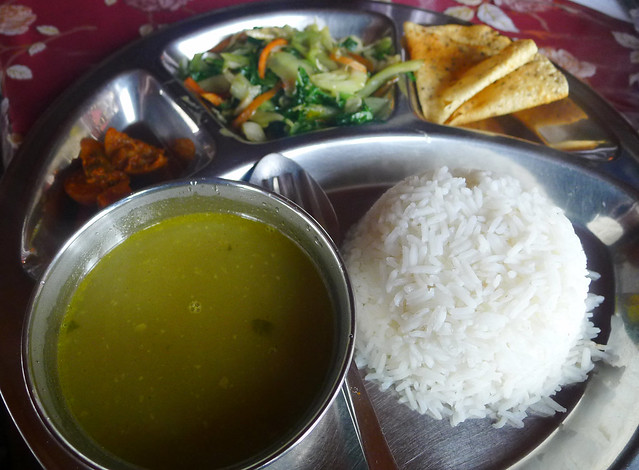 |
| I think dal bhat is the reason why Nepalis are so strong and can carry truckloads of stuff on their backs. As my porter Dhan Kumar would say, "Dal bhat power, 24 hours!" |
5. Bring cash. I kind of learned this the hard way. Before the trek, I made sure to withdraw enough money from an ATM in Thamel, Kathmandu, because I read somewhere that there would not be any ATMs to be found up on the trail (for very obvious reasons). No credit card machines either past Namche, of course. So make sure you have Nepalese Rupees with you before you fly to Lukla. This is so important. When I got back from the trek, I was kind of running low on cash and I wanted to withdraw money, especially when I was stuck for an extra day in Lukla. No ATM machines there, but you could ask your guide to bring you to a few banks in Lukla that can swipe your credit card for you, and then they will provide you with the cash equivalent. Thankfully, I didn't have to do that, as I was able to fly to Kathmandu the next day.
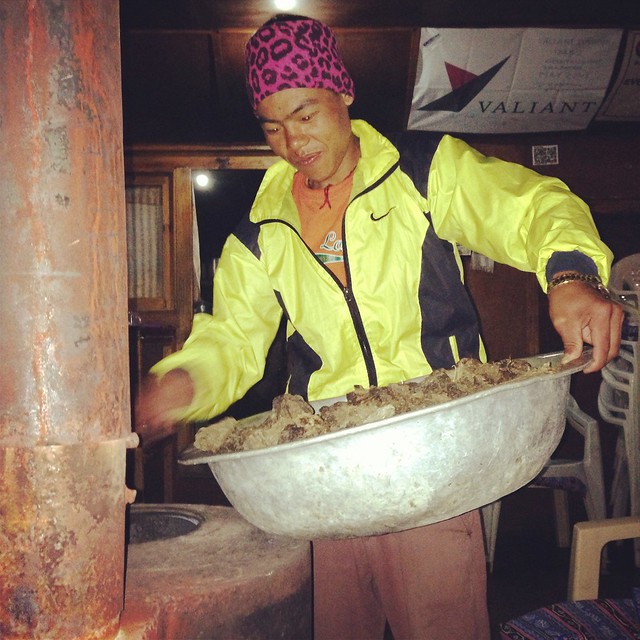 |
| Dhan Kumar places dried yak dung into the stove. Yak dung is used as fuel everywhere in the Khumbu region to keep people warm by the stove at night. |
Toilets are usually the squat kind, but many teahouses have at least one Western toilet. As for showers, you can encounter either a 'bucket shower' or a 'gas shower' in some teahouses. Read about my bucket shower experience if you're the type who needs to have at least one or two showers during the entire trek.
Rooms get smaller the higher you go up, but are decent enough, if you're not the fussy type. All rooms have pillows and blankets, and you could always request for extra, when it's low season. Come peak season, you will need to depend on your sleeping bag and just one blanket to keep you warm--as teahouses can really fill up fast with trekkers. Trekkers who aren't able to get a room end up sleeping in the dining hall.
Most teahouses at higher elevations are powered by solar electricity; there are times when you are unable to charge your phone or camera at all because there is no electricity. So when you are in a teahouse that does have electricity, do grab the opportunity to charge your gadgets. You wouldn't want to run out of batt when you get to Base Camp.
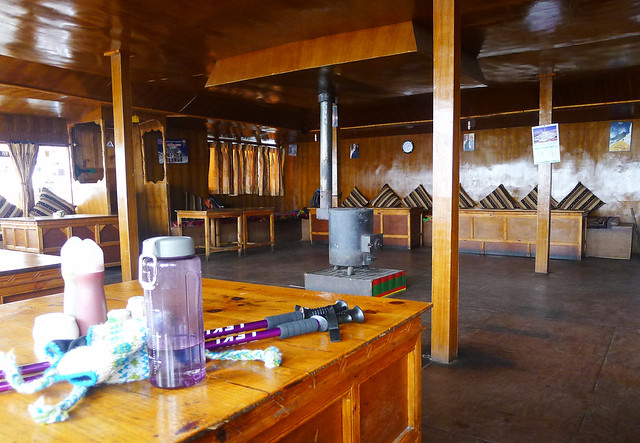 |
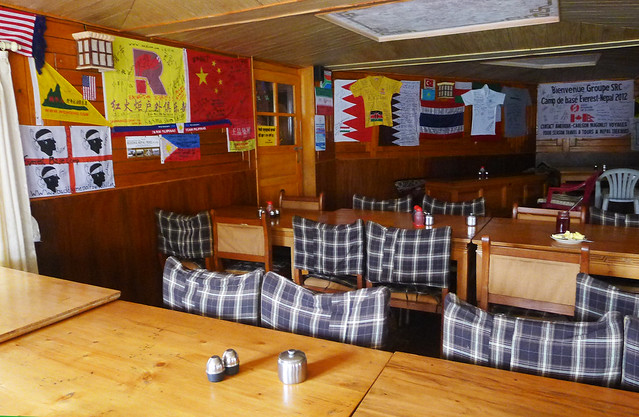
| A typical teahouse dining hall (with a stove in the middle) found throughout the Everest trail. |
 |
| A Sherpa carries his heavy load up the trail. It's just a typical day's work for them, but it's so mind-boggling to see so many of them do this all the time. Super humans! |
As for Sherpas, you can't help but respect them and give them the right of way-especially when they're carrying thick stacks of plywood on their backs or heavy drums filled with goods. The people of the Khumbu region are impressively strong, but they're human, too. When you encounter them on the trail carrying heavy loads, give them a break by not blocking their path. The reason you have a roof over your head and a decent bed to sleep in on the remote trails of the Himalayas is because Sherpas carried all those construction materials on their backs up to the top.
8. Respect the local culture. Be mindful of local customs, and when your guide tells you to always walk on the left side of a prayer wheel or a Buddhist Mani stone wall, or turn the prayer wheel in a certain direction, just do so. And it doesn't hurt to learn the local language either. Basic phrases like 'namaste' (hello/goodbye-which is also said a lot in my yoga classes) and 'dhanyabad' (thank you) are commonly exchanged between the locals and trekkers alike. I have an affinity for learning new languages so I asked Madan and Dhan Kumar to teach me as much Nepali as they could. I had them laughing in stitches every time I'd say something funny (or naughty) in Nepali, which is a nice language to learn.
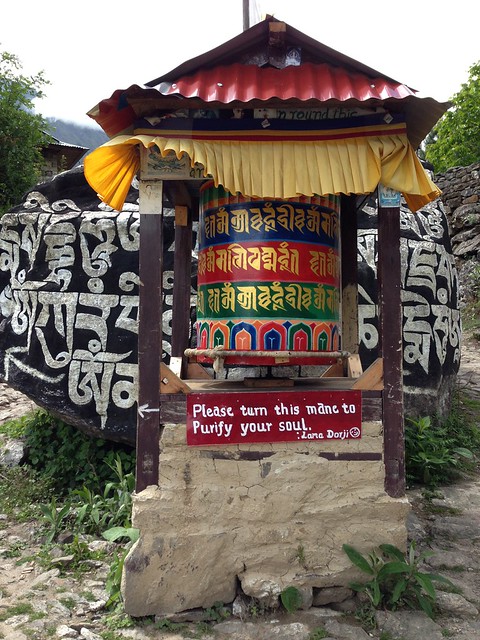 |
| Always turn the prayer wheel in a clockwise direction. And always walk on the left side of a Buddhist Mani stone. |
When you see Sherpas carrying their heavy load or are at rest on the trail, just say, 'Namaste. Ke cha?' Then watch them break into smiles.
To be honest though, I think the one local thing I had difficulty accepting was that guests are served their food first, and guides/porters have to wait at least 30 minutes or an hour after for them to receive their food. It is understandable that Nepalese would want to consider their guests as first priority, but as a trekker traveling with both her guide and porter, I felt uncomfortable being served food while my two companions, who were equally tired and hungry as I was, had to wait some more. In my country, regardless of social or economic status, food is served to everyone at the same time and people normally eat together.
But the Nepalese teahouse owners were pretty nice about my requests to have Madan's, Dhan Kumar's and my food served together. They were a little surprised about such requests, but very obliging.
9. Buy all you need in Thamel, Lukla or in Namche. If you've forgotten to get some trekking gear in your own country, you can do last-minute shopping in the bustling backpacker district of Thamel, Kathmandu, the best place to be in for all your trekking needs. Lukla has a lot of shops too, but with lesser choices compared to Kathmandu.
As for Namche Bazaar, think of it as the Rivendell of your trek. It is the last point of civilization as you know it. Goods become scarcer and way too pricier as you ascend past Namche. So if you need to buy trekking gear, hand sanitizer, energy bars, multivitamins or even a deck of playing cards, Namche Bazaar is your last chance to do so.
10. Counter Altitude Sickness. Last, but certainly not the least! Acute mountain sickness (AMS), or commonly referred to as altitude sickness, is, I think, the great equalizer when it comes to trekking. Regardless of fitness level, age and even mountaineering experience, everyone is bound to feel AMS at some point past the 3,000 meter mark. It just depends on the degree of altitude sickness that you've contracted. Altitude sickness is no joke, and can even lead to death. On the day I was to reach Base Camp, I learned about the deaths of two trekkers who never made it due to altitude sickness.
Mild AMS is normal and is experienced by many. But severe AMS is debilitating, and any person with moderate to severe AMS should already be given the medical attention needed. Under such cases, the trekker experiencing bad altitude sickness is already made to descend as rapidly as possible before it becomes fatal.
Mild symptoms include headache, fatigue, breathlessness, and loss of appetite--all of which I experienced at some stages and which were addressed immediately. You know you already have severe AMS if you're experiencing severe headache, disorientation, vomiting, breathlessness (even at a standstill) or if you're exhibiting irrational behavior. If these symptoms are happening at the same time or one after the other, you need to descend immediately or have your guide arrange for a helicopter evacuation, weather permitting.
Here's how to avoid severe altitude sickness:
a. Proper Acclimatization - I talked about acclimatization in this post, as explained to me by Naba and Madan of Himalayan Planet Adventures. The general rule is to 'climb high, sleep low.' And for about every 1,000 meters of ascent, you will be asked to stay an extra day at that current level in order for your body to adjust and acclimatize. Your guide should be able to advise you on this. And please do not trek completely alone. Who's going to guide you down the path when you have a massive headache, and you're retching and feeling dizzy and disoriented? When I was experiencing minor AMS on the way to Pangboche on Day 4, Madan and Dhan Kumar were there to help me and monitor my condition.
 |
| A bowl of garlic soup a day keeps the altitude sickness away. I had one every night while on the trail. |
c. Take Diamox - Diamox (generic name: Acetazolamide) is the medicine one takes to counter the effects of altitude sickness. On the Internet, there are differing opinions as to when to take it--whether to start taking it 24 hours before the trek or to take it when you start feeling symptoms, or to simply avoid it at all. My advice: consult a doctor prior to the trek. Diamox can affect people in different ways. In my case, I only took Diamox when I started contracting minor altitude sickness, which was in Day 4 of the trek. My daily dosage was 250mg--split into two, so I could take 125mg in the morning and 125mg in the evening. You can buy Acetazolamide in Kathmandu or in your own country. In the Philippines, it is known as Cetamid. Some typical side effects of Diamox include frequent peeing and a tingling sensation on your toes and fingertips.
d. Pace yourself - I honestly don't get why some trekkers feel pressured into going up to Everest Base Camp as fast as they can. This isn't a race. Nobody back home would really care about your pace per day or if you outpaced your trekmates; they just want you safe and alive. I hear and read sad stories about how there are ultra-fit, super competitive people who trekked to EBC only to descend because their bodies couldn't handle it, that they didn't acclimatize properly, that they overexerted themselves, etc. In some cases, trekking with a group even presents dangers, as people have different stride lengths, endurance levels, and pacing--and all this makes some feel 'pressured' into keeping up with the overall pace of the group.
e. Avoid alcoholic beverages and cigarettes during the trek - You do not want a hangover to enhance your experience of altitude sickness. You really do not. And breathing the thin air through the nose or mouth is already a hard task; you won't be able to smoke properly anyway. Reserve the liquor and tobacco for your last day, when you're back in Lukla.
Sorry for the long post, but that's pretty much it! All the important stuff to know before heading off for the Everest Base Camp trek. This is my last post on Everest Base Camp (whew!) and I hope you found something useful or at least mildly entertaining in all the 10 or so posts I've written. The grandeur of the Himalayas has inspired me so much that I'm actually planning my next trekking trip to Nepal. I won't say yet where in Nepal exactly I'm going but I hope to update you on that one of these days. :)
 |
| Hello, goodbye, and see you again soon, Nepal! |